The ubiquity of cameras in smartphones has made just about everyone a photographer. However, not all the resulting images are good or interesting. Many are snapshots of friends, pets, landmarks and the like. Nothing wrong with them, but to give them value not just as records, but as strong images, here are a few things I’ve learned from too many decades of fiddling around with cameras.
Number 1
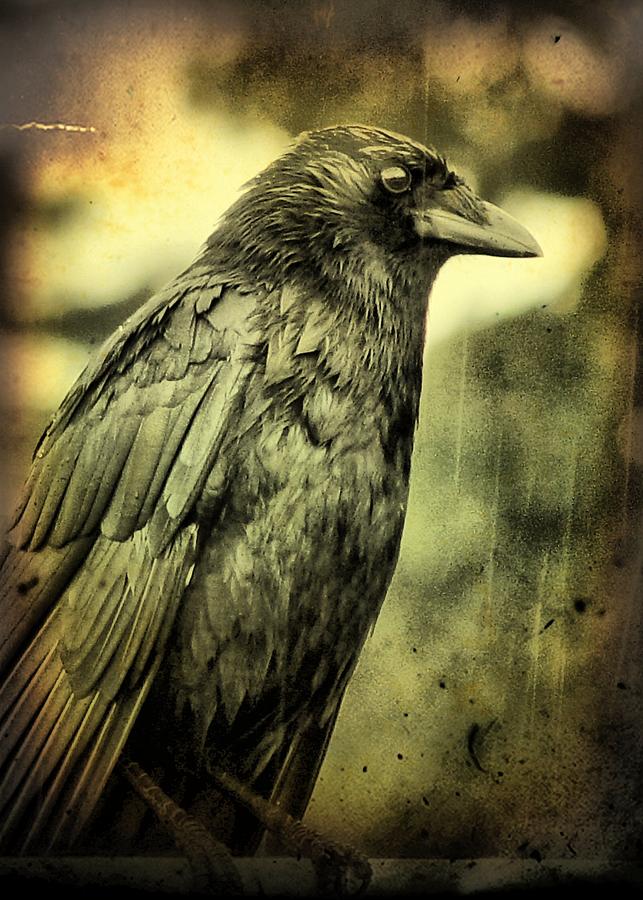
It’s more about what you see than your equipment. Camera phones, cheap digital or analog cameras, even a pinhole camera (essentially a box taped shut with a small hole in one end and a sheet of photo paper inside the other) can all produce good photos. There are certain situations where advanced and expensive equipment is necessary to get good results — low light, faraway things like birds or the moon, very fast-moving things, extreme macro close-ups, for example. But for the average shot of something or someone well lit and not too far away, almost any camera will work.
So, how do you see like a photographer?
First, recognize that most of the visual stimuli available to us goes unnoticed. We tend to look for certain aspects, and ignore everything else. Spend a little time, for example around a favourite building or landscape. Ignore the main things and look for the subtleties – reflections, shadows, interesting details, rhythm, patterns and contrasts in colour and texture. Is there graffiti or damage that’s intriguing? Everyone agrees that sunsets are beautiful. But instead of just capturing the sunset, what about its reflections in one of those all-glass buildings facing it? Or on a lake or pond? Everyone also agrees that newly-opened flowers are attractive. Where is the beauty in a dead or dried one? “Liminal,” the photo below, was taken fairly close up and looking straight down at a wave washing over wet sand: not a big impressive wave, just an interesting combination of colours and textures may people wouldn’t consider as a subject.

Second, change the point of view. We naturally take most pictures at eye-level when standing or sitting. What happens if you hold the camera at arm’s length above your head, or at foot level? Of course, it is difficult to see the screen when doing this, especially on a phone, so you may have to go by guess and by gosh. But sometimes the results will surprise you. One of my first digital cameras was a Sony with a clever flip-out viewing screen that rotated so I could actually see images from these odd perspectives. Also, we instinctively hold the camera aligned with the horizon (landscape orientation) or at a right angle to it (portrait). What happens, especially with landscapes or architecture, if you tilt it to a diagonal?
Finally, you want to hold the camera still most of the time. But moving it around in low light can produce some fascinating blur and surprises. One of my favourite tricks is to find Christmas lights at night, and then wave my camera around, which allows for a long exposure, due to low light, and fascinating solid or dotted lines of colour.

Number 2
Avoid visual clutter, unless you want an overall impression of density and variety. If you want a good shot of something specific, get as close as you can with your camera, and adjust the framing until that one thing is pretty much filling the screen. It will have more impact. The one exception is a portrait of someone’s face. They won’t react well to your shoving a camera at them, so use a mild zoom lens to stand back a bit. I spent half a year in Japan, and the “less-is-more aesthetic” in much of their visual art influenced me. One tree with a plain background is going to be more powerful, generally, than three trees with a lot going on behind and around them.
Number 3
Play around with composition – the things you include in the photo, and the angle from which they’re seen. One common approach to framing photos well is the “rule of thirds.” Of course, any rule or guideline can be broken effectively, but generally: avoid compositions that are too static or balanced. Imagine taking a shot of a lake with an interesting sky over it. Where do you place the horizon line? If it’s exactly half-way up the image, that won’t be as striking as 2/3rds sky, 1/3rd water, or vice-versa. If you’re taking a full-length shot of a model, have the person stand in the left or right third of the frame, and compare it with one of them standing right in the middle.

Number 4
Play around with timing. Another influential theory is that of the great French photographer Cartier-Bresson. He said that in many images there is a “decisive moment” where a tension exists. A famous shot of his is an everyday scene – a close-up of a man’s legs as he navigates planks to cross a large puddle. Cartier-Bresson waited until his model launched a leap between planks… and that was the picture. Also, I’ve found with portraits that the best results are not often the one in which the model is staring at the camera and offering his or her “photo smile”. Wait until they’re occupied with something, distracted, or bored with posing. Then take the image that shows their less guarded self.
Number 5
Learn from the greats. Look at work by accomplished or famous photographers and adapt their approaches to develop your own “eye.” You may not have the equipment or technical know-how yet to duplicate their results, but consider the choices they make in composition, lighting, and timing. Here are a few of my favourites: Diane Arbus, Annie Liebovitz, Tina Modotti, Margaret Bourke-White, Minor White, Man Ray, Bill Brandt, Edward Weston, Cartier-Bresson, Ralph Eugene Meatyard … the list could go on. You could do worse than pick up some of the old Time-Life photo books at a lawn or library sale and leaf through them. When you find a photo you really like, look for more of that artist’s work online.
Number 6
Here’s an exercise to develop your photo skills. Pick a common, simple object… an egg or rock, for example. Shoot it as many different ways as you can imagine. Try it outside in “magic hour” lighting… when the sun is low after dawn or before twilight, and then at full noon. Try it inside with one directional light, general light, etc. Try it on a complex background, and none at all (for example, against a black cloth or paper). Have a model hold it. What works best and why? Apply what you’ve learned to shooting other things. And my last suggestion: go for regular walks, especially in areas you don’t usually visit, and take your camera. Get at least one good image from each walk.
I hope this is of some help to you. Of course, taking courses, learning a photo-manipulating program like Photoshop or Lightroom, joining an online photographers’ group and asking for critiques, getting a better camera, will help too. But start off by applying some of my advice to the camera you already have, and see what happens.
___
John Oughton is also a writer and guitar player. You can view a sampling of his photos at https://joughton.wixsite.com/imagenery